
Introduction
As technology advances, the need to upgrade our media collections becomes increasingly important. DVDs and Blu-rays have become obsolete in today’s digital age, but many of us still hold onto them as a nostalgic reminder of the past. In this blog post, we’ll explore how to rip your DVD/Bluray collection using MakeMKV and re-encode it with HandBrake, giving you a modern and compatible media library.
Step 1: Prepare Your Collection
Before we dive into the technical details, make sure you have:
- A DVD or Blu-ray player connected to your computer
- The MakeMKV software installed on your computer (available for Windows, macOS, and Linux)
- HandBrake software installed on your computer (available for Windows, macOS, and Linux)
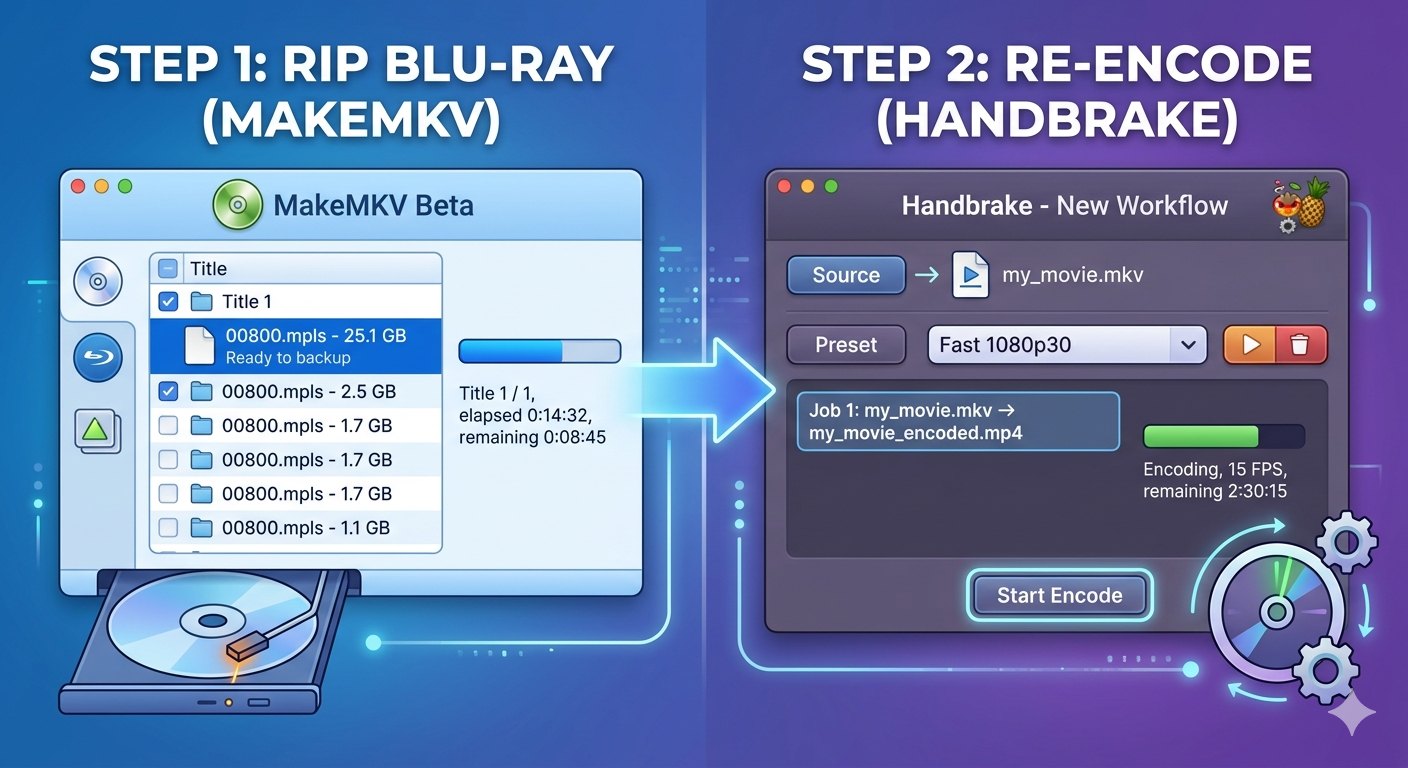
Step 2: Rip Your DVDs/Blu-rays with MakeMKV
To rip your DVDs/Blu-rays using MakeMKV, follow these steps:
- Insert the DVD/Blu-ray into your player
- Connect the player to your computer via USB or HDMI (depending on the device)
- Launch MakeMKV and select the DVD/Blu-ray disc as the source
- Choose the desired output format and settings (e.g., H.264, 1080p, etc.)
- Click “Start” to begin the ripping process
MakeMKV will extract the video and audio streams from your DVD/Blu-ray and save them to a folder on your computer.
Step 3: Convert with HandBrake
To convert the ripped video files into a more modern format using HandBrake, follow these steps:
- Launch HandBrake and select the video file you want to convert
- Choose the desired output format (e.g., H.264, MP4, etc.)
- Use a container format that is supported by most devices such as MP4 (MPEG-4). HandBrake supports various output formats, including:
- H.264 (MP4)
- H.265 (HEVC) for UHD content
- VP9 and VP8 for web-friendly playback
- AAC, AC3, and DTS for lossless audio
- Select the desired resolution and aspect ratio (if applicable)
- For smart TVs and streaming services, use 1080p (1920×1080) or 4K (3840×2160)
- For mobile devices, use 720p (1280×720) or 1080p (1920×1080)
- Adjust any other settings as needed (e.g., bitrate, frame rate, etc.)
- For smart TVs and streaming services, use 24fps, 25fps, or 30fps
- For mobile devices, use 24fps, 25fps, or 30fps
Step 4: Re-Encode Audio
To ensure optimal audio quality, you may need to re-encode the audio streams using HandBrake as well. Follow these steps:
- Choose the desired output format (e.g., AAC, AC3, etc.)
- AAC (Advanced Audio Coding)
- AC3 (DTS Surround Audio)
- DTS (Digital Theater Systems)
- Select the desired bitrate and sample rate (if applicable)
- Click “Start” to begin the conversion process
Step 5: Add metadata and subtitles
Add metadata and subtitles to your files to enhance playback compatibility:
- Use a compatible subtitle format, such as SRT or ASS
- Add metadata, including title, artist, and genre
Step 6: Verify Your Files
After completing the ripping and re-encoding process, verify that your files are compatible with modern media players and devices:
- Play the converted file on a Windows or macOS machine using a media player like VLC or QuickTime
- Test playback on an Android device or smart TV to ensure compatibility
- Check online compatibility tests (e.g., MP4Checker) to confirm compatibility
Conclusion
Ripping your DVD/Bluray collection with MakeMKV and re-encoding it with HandBrake can be a great way to upgrade your media library. By following these steps, you’ll end up with a modern, compatible media collection that’s ready for streaming or playback on a variety of devices.
Additional Tips and Resources
- Consider using a USB hub or external drive to store your ripped files and make it easier to access them.
- HandBrake has many advanced features, such as multi-threading and GPU acceleration, which can significantly speed up the conversion process.
- MakeMKV also supports ripping Blu-rays with UHD (4K) content, but requires a compatible device or external player.
- Always check online forums and reviews for specific compatibility issues with different devices or software.
If you have any questions or need further assistance, feel free to ask!